
A paneer making machine that's installed incorrectly rarely fails outright ,it just gives inconsistent results. Uneven curdling, poor whey drainage, cracked or lopsided paneer blocks, or a press that never seals properly can usually be traced back to the installation stage, not the equipment itself. For dairy plants, commercial paneer units, sweet manufacturers and food processing businesses, getting the setup right from day one protects both product consistency and equipment life.
This guide walks through how to install a MILKY® paneer making machine from site preparation through commissioning so operators know what to check at each stage. MILKY® paneer and cheese making machines are manufactured by Mahesh Eng. Works, and installation guidance is available for every model and configuration supplied.
 Installation Support
 Mahesh Eng. Works is an ISO 9001:2015 certified manufacturer based in Gandhinagar, Gujarat, with experience since 1980 across dairy equipment including paneer and cheese making machines, milk cream separators, and ghee clarifiers. MILKY® paneer making machines are built from food-grade SS304/SS316 stainless steel, available from 100 to 2,000 litres per batch, and the company provides installation guidance and after-sales support to help businesses set up their equipment correctly.
Before commissioning the paneer making machine, verify that the equipment is correctly positioned, levelled, and connected to the required electrical, water, heating, steam, pneumatic, and drainage services. Check all mechanical and utility connections against the machine specifications to ensure safe operation, proper hygiene, and reliable production performance.
Installation Note: Actual utility requirements may vary by machine model, capacity, and configuration. Always verify electrical, water, heating, steam, pneumatic, and drainage requirements against the machine’s technical specifications before installation.
| No. | Technical Data | What to Do |
|---|---|---|
| Step 1 | Inspect the machine. | Check the vat, press unit, cutting attachment (if included), motor, and fittings against the delivery documentation for transit damage or missing parts. |
| Step 2 | Prepare the installation location. | Choose a clean, well-ventilated area with a stable, sloped floor for whey drainage, access to water and electrical supply, and enough clearance for CIP cleaning and operator access. |
| Step 3 | Position and level the machine. | Place the coagulation vat and press unit on a level surface. Uneven positioning can affect curd settling and press alignment. |
| Step 4 | Check electrical supply and earthing. | Have a qualified electrician confirm the supply matches the machine's rated requirement (3 phase, 50Hz standard on most models) and that proper earthing is in place before wiring. |
| Step 5 | Connect heating/temperature-control and water supply. | Clean thoroughly, then assemble in the correct sequence and orientation. |
| Step 6 | Connect the compressed air line (pneumatic models). | If your press uses pneumatic operation, connect and check the compressed air supply line before running any pressing cycle. |
| Step 7 | Check whey drainage and outlet connections. | Confirm whey outlet valves and drainage lines are properly fitted and directed to floor drainage, since poor drainage is a common cause of hygiene and cleanup issues. |
| Step 8 | Check connections before startup. | Recheck electrical, water, air, and drainage connections together before switching the machine on. |
| Step 9 | Perform an initial trial batch. | Run a small trial batch to confirm the vat reaches the correct coagulation temperature, curd forms consistently, whey drains properly, and the press cycle completes as expected. |
| Step 10 | Complete commissioning checks. | Confirm consistent curd texture, correct pressing pressure and timing, no leakage, and stable operation before regular production begins. |
Download Full Brochure
Get drawings, full specifications, layout requirements and pricing on email.
MILKY® Paneer Making Machines are engineered for efficient, hygienic, and consistent paneer production across dairy plants, sweet shops, restaurants, and commercial food-processing units.

Stable, level, hygienic, with suitable drainage for whey and cleaning water

Match the machine’s rated voltage, phase, and frequency

Proper earthing provided before electrical connection

Adequate water available for processing and cleaning/CIP

Required for pneumatic press models

Clear and hygienic drainage path from the outlet

Adequate clearance for operation, maintenance, and cleaning

Clean, food-grade processing environment suitable for dairy production

Clean the coagulation vat, pressing plates, moulds, and other product-contact components before assembly and use.

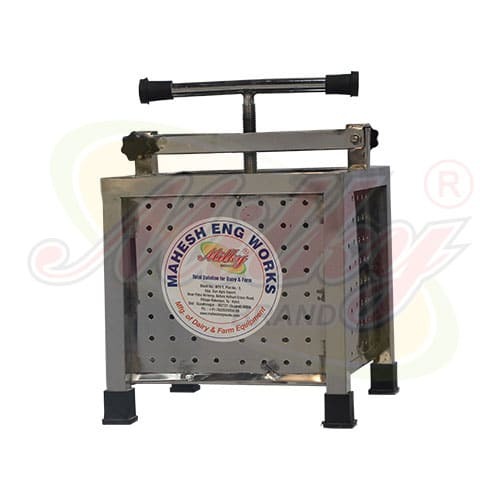
Position the vat, pressing plates, moulds, and supporting components correctly according to your MILKY® machine model.

Ensure the pressing plates, moulds, frames, and locking components are properly seated and secured before operation.

Check the whey outlet and drainage arrangement to ensure efficient whey removal during pressing.

For applicable models, securely connect and inspect air or hydraulic lines before starting the pressing cycle.

Vat capacity, press mechanism, mould size, and cutting arrangement can vary according to machine capacity and model.
Correct assembly supports uniform pressing, controlled moisture removal, and consistent paneer block formation.
Never operate the machine until all components, connections, and safety provisions are properly secured according to the supplied instructions.

All wiring should be carried out by a qualified electrician, matched to the machine's rated supply, with proper earthing confirmed before power is connected. Appropriate protective electrical equipment should be in place, and no work should ever be done on live equipment.

Connect the water supply needed for processing and CIP cleaning, and the heating or temperature-control system for the coagulation vat as specified for your model. Pneumatic press models additionally require a secure compressed air connection, checked for leaks before operation.

Before starting : Confirm all electrical, water, air, and drainage connections are complete and secure.

Run the heating/temperature-control system and confirm the vat reaches a stable, consistent temperature before introducing milk.
Check curd formation, whey drainage, and pressing cycle completion.
Coagulation temperature and heating connection
Drainage outlet fitting and floor slope
Press alignment and pressing plate assembly
Compressed air line connections and fittings
Electrical supply and protection devices
Pressing pressure, timing, and hoop assembly
Mahesh Eng. Works provides installation guidance and after-sales support for MILKY® paneer and cheese making machines supplied across India and to export markets. Whether you’re setting up a new machine or troubleshooting an existing installation, the team can help you get it running correctly.
Paneer is made by acid coagulation of heated milk as a standard reference point, traditional paneer-making heats milk to around 85°C before adding the coagulant. The exact temperature setting, hold time, and control method (electric or steam-based heating) can vary by machine model and configuration, so operators should follow the specification and operating instructions supplied for their particular MILKY® machine rather than applying one figure universally.
Need heating guidance? Contact us.A paneer making machine is generally installed by preparing a stable, drained location, positioning the vat and press, checking electrical and utility connections, connecting water and any required heating or compressed air supply, checking whey drainage, and commissioning the machine with a trial batch.
You'll need a stable, level, sloped floor for whey drainage, a matching 3-phase electrical supply with proper earthing, a water connection, and for pneumatic models a compressed air supply. Confirming the exact model and pressing system beforehand helps avoid mismatched requirements.
Electrical and utility connections should always be handled by qualified technicians, and press assembly should follow model-specific instructions closely. Working with the manufacturer's guidance reduces the risk of assembly or connection errors.
Product-contact surfaces are cleaned thoroughly, then pressing plates, hoops, and locking components are assembled per the model's instructions, with air or fluid lines checked for pneumatic or hydraulic presses.
Traditional paneer making heats milk to around 85°C before coagulation, though the exact setting and control method can vary by machine model. Confirm the specification for your particular unit.
Vibration is usually caused by an unstable or uneven floor, or by incorrect bowl/disc assembly throwing off the balance of the rotating stack. Both should be checked before continued use.
Uneven pressing is commonly linked to misaligned pressing plates, incorrect hoop assembly, or (for pneumatic models) inconsistent air pressure. Checking these areas resolves most cases.
Yes. Proper earthing is a standard electrical safety requirement and should be verified by a qualified electrician before the machine is connected to power.
Poor drainage is usually caused by an incorrectly fitted outlet valve or a floor that isn't sloped toward the drain. Both should be checked during installation.
Yes. Mahesh Eng. Works provides installation guidance and after-sales support for MILKY® paneer and cheese making machines supplied across India and to export markets.
Only pneumatic press models require compressed air. Manual and hydraulic press models have different utility requirements confirm which applies to your machine.
Talk to Mahesh Eng. Works today for the latest price, technical guidance, capacity recommendation, and machine configuration.