
If you’ve ever wondered why your cream separator isn’t giving you that thick, rich cream it used to — or why it’s making a strange noise — the answer almost always comes back to one thing: the parts. Understanding cream separator machine parts isn’t just for mechanics. Whether you’re a homesteader doing small batches or running a commercial dairy operation, knowing what each component does (and when to replace it) can save you hundreds of dollars and a lot of frustration.
This guide covers every major part of a cream separator — what it’s called, what it does, where it sits in the machine, and how to know when it’s time to replace it. We’ve also included a labelled diagram reference table and a straightforward replacement schedule you can actually use.
Quick Answer: A cream separator works by spinning raw milk at high speed inside a bowl. The heavier skim milk moves outward while the lighter cream rises to the center — and different parts of the machine control, regulate, and redirect each of those flows.
How a Cream Separator Works — The Short Version
Before diving into individual parts, it helps to understand the basic process. Raw whole milk enters the machine and gets funneled into a rapidly spinning bowl (usually between 6,000 and 10,000 RPM). Centrifugal force does the heavy lifting — it pushes the denser skim milk outward toward the bowl walls, while the lighter cream collects near the center. These two streams then exit through separate outlets.
Every part of the machine either supports this spinning process, regulates the flow of milk, or ensures the separation stays clean and consistent. When any one part wears out or gets clogged, the whole system suffers.
Cream Separator Machine Parts — Labelled Diagram & Functions
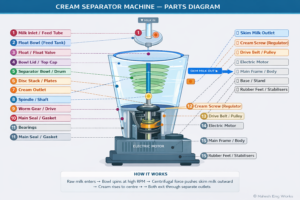
Key Cream Separator Parts — Explained in Detail
1. The Separator Bowl (Drum)
This is the heart of the machine. The bowl is a sealed, cone-shaped drum that spins at very high speed. Raw milk enters at the bottom and the centrifugal force inside the bowl is what physically separates the cream from the skim milk. Most bowls are made from food-grade stainless steel or BPA-free plastic, depending on the model.
Common issues: Over time, the bowl can develop hairline cracks (especially plastic models), warping from heat, or stubborn mineral deposits if not cleaned properly after each use. A cracked bowl is a food safety issue and should be replaced immediately.
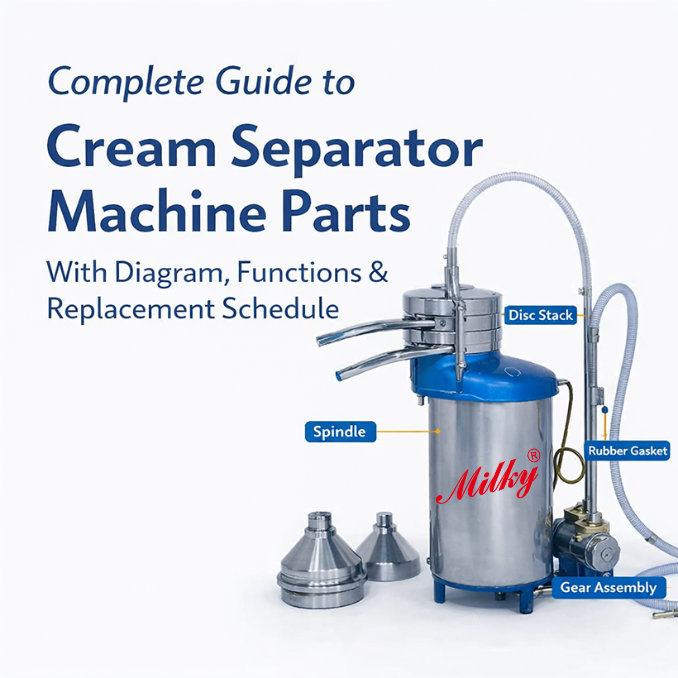
2. Disc Stack (Separator Plates)
Inside the bowl you’ll find a stack of thin, cone-shaped discs — sometimes 20 to 50 of them depending on the model. These discs are the real workhorses of separation. By creating dozens of thin channels, they dramatically increase the surface area over which separation happens, making the process far more efficient than a plain empty bowl could achieve.
Common issues: Discs accumulate milk stone (calcium and protein deposits) quickly if not cleaned with the right solution. Over time they can also bend slightly or develop pitting. Even one warped disc can throw off separation quality across the whole stack.
3. Cream Screw (Regulating Screw)
This small but important part lets you control how rich your cream is. By tightening or loosening the cream screw, you adjust the boundary between the cream and skim milk layers inside the bowl. Tighten it and you get thicker, higher-fat cream. Loosen it and the cream comes out lighter — useful if you want coffee cream rather than heavy whipping cream.
Common issues: The threads on the cream screw wear down over time, especially with frequent adjustments. A stripped screw gives you no control over fat content. Replacements are cheap and worth keeping a spare of.
4. Main Seal and Gaskets
Seals and gaskets are the unsung heroes of any cream separator. They sit at the junctions between the bowl, body, and outlets, keeping milk and cream in their respective channels and preventing leaks. Most are made from food-grade rubber or silicone.
Common issues: Rubber seals are particularly vulnerable to heat, chemical cleaners, and general age. They crack, stiffen, or shrink — any of which causes leaks. If milk is weeping out from around the bowl area, the seal is almost always the culprit. Fortunately, seals are one of the cheapest parts to replace.
5. Bearings
Bearings support the spindle (the vertical shaft that spins the bowl) and allow it to rotate smoothly at very high speeds. Without good bearings, the bowl would wobble, overheat, and eventually seize up. Most separators use ball bearings, and they’re typically pre-lubricated from the factory.
Common issues: Worn bearings are usually announced loudly — you’ll hear grinding, humming, or unusual vibration that wasn’t there before. Ignoring this will lead to spindle damage, which is a much more expensive fix.
6. Drive Belt and Pulley
On electric models, the motor connects to the bowl spindle via a drive belt and pulley system. The belt transmits rotational energy from the motor to the drive gear, which then spins the bowl. On manual (hand-crank) models, a worm gear takes this role directly.
Common issues: Belts stretch, fray, and eventually snap — especially if the separator is used heavily or the belt tension isn’t maintained. A slipping belt means the bowl never reaches full separation speed, leading to poor cream quality. Belts are inexpensive and easy to swap out.
7. Float and Float Valve
The float sits in the milk feed tank and controls how much milk enters the separator bowl at any given moment. Think of it like the float in a toilet cistern — it rises with the milk level and cuts off flow when the level gets too high, preventing overflow and keeping the feed rate steady.
Common issues: A stuck or damaged float valve leads to inconsistent milk flow — either too fast (causing poor separation) or intermittent (causing the machine to run dry and then surge). Clean the float assembly regularly, especially if your milk contains sediment.
8. Frame and Base
The frame holds everything together and provides stability during operation. At 6,000+ RPM, even small vibrations can become significant problems, so a solid, level base is more important than people often realize. Most frames are cast iron or heavy-duty steel.
Common issues: Cracks in cast iron frames are serious and usually mean the unit is at end of life. More commonly, rubber feet wear out and the machine starts ‘walking’ across the counter during use. Replacement feet are a very cheap fix.
Cream Separator Parts Replacement Schedule
One of the most common questions dairy farmers and homesteaders ask is: how often do I actually need to replace these parts? The honest answer depends on usage intensity and how well the machine is cleaned and maintained — but the table below gives you a solid baseline to work from.
| Part | Check Frequency | Replace When | Signs of Wear |
| Bowl / Drum | After every use | Every 3–5 years | Cracks, discoloration, warping |
| Discs / Plates | Monthly | Every 2–3 years | Deposits, bending, pitting |
| Main Seal / Gasket | Monthly | Annually or when leaking | Leaks, cracks, brittleness |
| Bearings | Every 3 months | Every 2–4 years | Noise, vibration, overheating |
| Drive Belt | Monthly | Every 1–2 years | Fraying, slipping, cracking |
| Cream Screw | After every use | When stripped or damaged | Poor separation, inconsistency |
| Skim Milk Outlet | After every use | When cracked or blocked | Blockage, residue buildup |
| Worm Gear / Spindle | Every 6 months | Every 4–5 years | Grinding noise, slippage |
| Float / Float Valve | Monthly | When flow becomes erratic | Irregular milk flow |
How to Make Your Parts Last Longer
Replacing parts is sometimes unavoidable, but good maintenance habits can significantly extend the life of every component. Here’s what actually makes a difference:
- Clean after every use — milk residue becomes milk stone within hours, especially in warm climates. Rinse with warm water first, then wash with a food-safe alkaline cleaner.
- Never use boiling water on plastic bowls or seals — hot water causes warping and rubber deterioration faster than almost anything else.
- Keep the exterior dry — water that gets into the base and around the drive mechanism accelerates corrosion on the frame and worm gear.
- Lubricate bearings annually — many models have a small lubrication port. Use the manufacturer-recommended grease, not general-purpose oil.
- Run at the correct speed — both over-speeding and under-speeding wear parts faster. Check your model’s rated RPM and dial it in.
- Inspect gaskets and seals before each season — if they feel stiff or look cracked, replace them before you start, not after a leak develops.
Where to Find Replacement Parts
Sourcing cream separator parts can be tricky, especially for older or imported models. Here are your best options:
- Manufacturer websites — always the first stop for current models. OEM parts are guaranteed to fit and meet food-safety standards.
- Specialty dairy equipment suppliers — companies like Hamby Dairy Supply (US) or similar regional suppliers often stock universal parts that fit multiple brands.
- Amazon and eBay — useful for common consumables like belts, seals, and cream screws. Read reviews carefully and confirm compatibility before ordering.
- Local agricultural co-ops — many carry basic separator spares, particularly for popular brands like Milky FJ or Westfalia.
Important: Always confirm the part number against your model’s manual before ordering. Cream separator bowls and disc stacks in particular are not universally interchangeable — even a 1mm difference in disc diameter affects performance.
Frequently Asked Questions
Q: What are the most commonly replaced parts in a cream separator?
The most frequently replaced parts are the main seal/gasket, the drive belt, and the cream screw. These three components take the most wear during regular operation and are also the cheapest and easiest to swap out. It’s worth keeping spares of all three on hand.
Q: How do I know if my cream separator bowl needs replacing?
Look for visible cracks, warping, or deep discoloration that doesn’t clean off. On plastic bowls, any crack is a hygiene risk and means immediate replacement. On stainless steel bowls, pitting or corrosion around the disc seats affects separation efficiency. If your separation quality has dropped noticeably despite a clean machine and fresh milk, the bowl and disc stack are the first things to inspect.
Q: Can I use universal replacement parts, or do I need OEM?
For consumables like seals, gaskets, and belts, universal parts often work perfectly fine and cost significantly less. For precision parts like the bowl, disc stack, and cream screw, it’s safer to use OEM or parts specifically listed as compatible with your exact model. Disc dimensions in particular are critical — even minor differences affect how well cream and skim milk separate.
Q: Why is my cream separator not separating properly?
Poor separation is almost always caused by one of four things: milk temperature is too cold (aim for 35–40°C for best results), the bowl speed is too low, the cream screw is set incorrectly, or the disc stack is fouled with milk stone. Work through these four checks before assuming a part needs replacing.
Q: How often should I clean the disc stack?
Ideally, after every single use. The disc stack accumulates protein and calcium deposits faster than any other part. A 30-minute soak in a warm alkaline cleaning solution (food-grade) after use prevents milk stone buildup. If you’re doing heavy daily use, a weekly deep clean with a dedicated milk stone remover is also a good idea.
Q: What’s the difference between a 3-part and 5-part separator bowl?
This refers to how many separate pieces the bowl assembly breaks down into for cleaning. A 5-part bowl has more individual components (separate lid, skimmer, distributor, etc.) which gives you more thorough cleaning access but more to reassemble correctly. A 3-part bowl is simpler and faster to clean. Neither is inherently better — it comes down to your preference and how meticulous your cleaning routine is.
Q: Is it worth repairing an old cream separator or buying a new one?
Generally, if the frame is solid and the bowl/drum is in good condition, a cream separator is worth repairing — even multiple times. The expensive parts (frame, motor, bowl) rarely fail catastrophically. Most repairs involve cheap consumables. The exception is if you’re dealing with cracks in the bowl or frame, or if the worm gear has stripped — at that point, repair costs can approach or exceed the price of a new entry-level unit.
Final Thoughts
A cream separator is a relatively simple machine — but simple doesn’t mean maintenance-free. The parts work hard every time you run it, and they genuinely do wear out. The good news is that most of the components that fail are inexpensive and easy to replace if you catch them early.
Use the diagram table to get familiar with what’s inside your machine, follow the replacement schedule as a starting guide (adjusting for how often you use it), and keep a small spares kit on hand. Do those three things and your separator should give you years of reliable service — and consistently good cream.
Still Have Questions About Your Dairy Equipment? Mahesh Eng. Works is an ISO 9001:2015 certified manufacturer and exporter of premium dairy machinery — trusted by 20,000+ clients across India and beyond. From cream separators to complete dairy plant setups, we build equipment that works hard so you don’t have to.

Mahesh Eng. Works
Written by Mahesh Engineering Works, specializing in precision dairy machinery and hygienic stainless-steel dairy solutions for small and medium dairy plants in India.