
A milking machine that's installed incorrectly rarely fails outright it just causes problems that are easy to blame on the animal. Inconsistent vacuum, air leaks, a pulsator that doesn't cycle evenly, or a claw that fits poorly can lead to incomplete milking, teat discomfort, or animals resisting the machine. For dairy farms of any size single-bucket setups through larger multi-unit operations, correct installation protects both animal welfare and milk yield from day one.
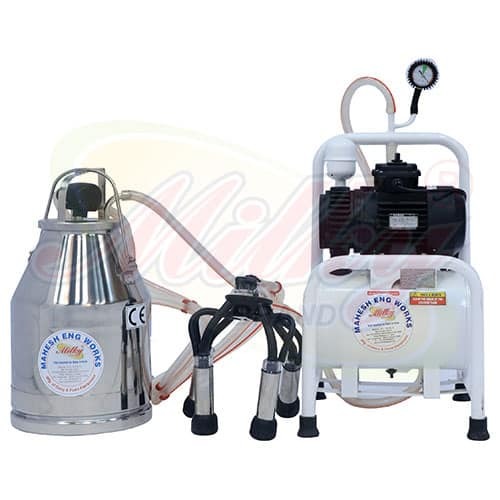
This guide walks through how to install a MILKY® cow or buffalo milking machine from site preparation through first use so operators know what to check at each stage. MILKY® milking machines are manufactured by Mahesh Eng. Works, and installation guidance is available for every configuration supplied.
 Installation Support
 Mahesh Eng. Works is an ISO 9001:2015 certified manufacturer based in Gandhinagar, Gujarat, with experience since 1980 across dairy equipment including milking machines, milk cream separators, and bulk milk coolers. MILKY® milking machines are available in single bucket, double bucket, and automatic configurations built from durable stainless steel components, and the company provides installation guidance and after-sales support to help farmers set up their equipment correctly.
Before installing a MILKY® Cow Milking Machine, confirm the machine model, milking capacity, installation area, electrical supply, earthing, vacuum system, and milk collection connections. Ensure all components are securely connected, the system is clean, and a test milking is completed before regular operation.
Installation Note: Installation requirements may vary by machine model and configuration. Always follow the supplied technical and operating instructions before commissioning.
| No. | Technical Data | What to Do |
|---|---|---|
| Step 1 | Inspect the machine. | Check the motor, vacuum pump, pulsator, claw, tubing, and can against the delivery documentation for transit damage or missing parts. |
| Step 2 | Prepare the installation location. | Choose a clean, well-drained area in the milking shed with easy access to electrical supply and enough space for the operator to move between animals. |
| Step 3 | Position and stabilize the vacuum pump/motor unit. | Place it on a stable, level surface — vibration or an unstable base can affect vacuum consistency over time. |
| Step 4 | Check electrical supply. | Confirm the available supply matches the motor's rated power (0.55 kW on standard single/double bucket models) before connecting, and have a qualified electrician handle the wiring. |
| Step 5 | Connect the vacuum line. | Fit the vacuum tubing between the pump and the claw assembly, checking every joint for a tight, leak-free seal — air leaks are one of the most common causes of inconsistent milking. |
| Step 6 | Assemble the claw and teat cups. | Fit the claw (240 cc on standard models) and teat cup liners correctly, ensuring liners are seated properly and free of damage before first use. |
| Step 7 | Connect the pulsator. | Confirm the pulsator is connected and cycling at its rated ratio (60/40 on standard models) — this rhythm mimics natural suckling and affects both milk flow and animal comfort. |
| Step 8 | Connect the milk can. | Fit the collection can (30L or 40L depending on model) and confirm it's securely attached with no leakage at the connection point. |
| Step 9 | Run an initial vacuum test. | Switch on the machine without an animal attached and confirm the vacuum pump reaches and holds its rated level smoothly, with no unusual noise. |
| Step 10 | Perform a trial milking and complete commissioning. | Attach the machine to one animal under supervision, confirm gentle and consistent operation with no signs of discomfort, then proceed to regular use. |
Download Full Brochure
Get drawings, full specifications, layout requirements and pricing on email.
Cow Milking Machines are engineered for efficient, hygienic, and gentle milking, helping dairy farms and commercial livestock operations achieve consistent milk collection with reduced manual effort.

Clean, stable, and well-drained for washdown

Matches the motor's rated power

Adequate room for operator movement between animals

Leak-free connections throughout
Available for daily cleaning of liners, tubes, and cans

Clean shed environment to protect milk quality

Calm, familiar space to reduce stress during first use

Clean teat cup liners, claw, milk tubes, and other product-contact components before assembly.

Fit the teat cup liners correctly and check for cracks, wear, or damage before use.

Ensure the claw body, teat cups, and milk tubes are properly connected and securely fitted.

Connect the pulsator correctly and verify that it operates at the specified pulsation rate.

Secure all vacuum tubing connections and check the system for air leaks before milking.

Claw type, pulsator specifications, vacuum requirements, and tubing arrangements can vary by machine model.
Correct assembly supports consistent vacuum, proper pulsation, efficient milk flow, and animal comfort.
Never operate the milking machine until the vacuum, pulsator, teat cups, and milk lines are correctly assembled and checked.

Wiring should be carried out by a qualified electrician, matched to the motor's rated power, with proper earthing in place before the machine is connected. No work should ever be done on live equipment.

Connect the vacuum pump to the claw assembly via the tubing, checking every joint for a secure, leak-free fit. A consistent vacuum level is essential both for effective milking and for animal safety fluctuating vacuum can cause discomfort or incomplete milk-out.

Before starting: Confirm all electrical and vacuum connections are complete and secure, and that liners and tubing are clean and undamaged.

Run the machine without an animal attached and confirm it reaches and holds a stable vacuum level smoothly.
Attach the machine under supervision and watch for calm animal behaviour, consistent milk flow, and no signs of discomfort or resistance.
Tubing joints and connections for air leaks
Liner condition, claw fit, and pulsator ratio
Vacuum level and claw/liner assembly
Pulsator connection and condition
Electrical supply and motor connection
Can seal and connection fitting
Mahesh Eng. Works provides installation guidance and after-sales support for MILKY® cow and buffalo milking machines supplied across India and to export markets. Whether you’re setting up a new machine or troubleshooting an existing installation, the team can help you get it running correctly and safely.
Once installed, milking machines require daily cleaning of liners, tubes, and cans to maintain milk hygiene and equipment performance, along with regular inspection of liners and periodic servicing. Establishing this cleaning routine from the first day of use protects both milk quality and the working life of the machine.
Request Technical AssistanceA milking machine is generally installed by preparing a clean, drained location, positioning the vacuum pump, checking electrical supply, connecting the vacuum line and claw assembly, connecting the pulsator and milk can, running an initial vacuum test, and completing a supervised trial milking.
You'll need a clean, well-drained shed area, a matching electrical supply, and enough space for the operator to move between animals. Confirming the exact model single bucket, double bucket, or automatic beforehand helps avoid mismatched requirements.
Electrical connections should always be handled by a qualified electrician, and vacuum/claw assembly should follow the model-specific instructions. Careful assembly matters directly for animal comfort and safety, not just machine performance.
The claw and teat cup liners are cleaned and seated correctly, and the pulsator is connected to cycle at its rated ratio (60/40 on standard MILKY® models). Damaged or worn liners should be replaced before use.
Inconsistent vacuum is usually caused by air leaks at tubing joints or connections. Checking every joint along the vacuum line resolves most cases.
Discomfort is commonly linked to a poor claw/liner fit, incorrect pulsator ratio, or vacuum fluctuation. All three should be checked before continued use.
Yes. MILKY® milking machines are designed for both cow and buffalo milking, with claw and liner fit suited to efficient extraction for either animal.
Yes. Proper earthing is a standard electrical safety requirement and should be verified by a qualified electrician before the machine is connected to power.
Poor drainage is usually caused by an incorrectly fitted outlet valve or a floor that isn't sloped toward the drain. Both should be checked during installation.
Yes. Mahesh Eng. Works provides installation guidance and after-sales support for MILKY® cow and buffalo milking machines supplied across India and to export markets.
Confirm all electrical and vacuum connections are secure, run a vacuum test without an animal attached, and confirm liners and tubing are clean and undamaged before attaching the machine under supervision
Talk to Mahesh Eng. Works today for the latest price, technical guidance, capacity recommendation, and machine configuration.